Welcome to the very first Fit Mamma blog, where all things related to your health and fitness will be discussed. Our first blog delves into the most common physical concerns mums face, and how best to combat them
This is going to target all those problematic areas of weakness, pain and tightness that most of us experience at one point or another, from a weak core, sore back, and tight hips. So I suggest you all read on and implement some of these exercises and stretches into your daily routine, to live a pain free, happy existence.
Firstly mums, during pregnancy your body starts adapting to accommodate your growing bub and preparing your body for birth. Hormonal responses encourage the relaxation of muscles, ligaments and tissue. This, coupled with a growing bub in your womb is obviously going to have an impact on your body and create some physical changes that need to be addressed.
Below are some of the most common physical concerns a post-natal mother may experience, and how best to treat them. Whilst these exercises are very basic and mild in nature, I recommend you consult your trusted medical professional before attempting them. This is especially so if you have given birth within the last 6 weeks. Your physio knows exactly how your recovery is progressing and will let you know what you should and should not be doing.
Before going into depth here is a list of the most common conditions a new mum might face.
Weak transverse abdominis/ core muscles
Weak pelvic floor
Abdominal separation (diastasis Recti)
Tight/sore lower back
Tight hip flexors/quads
Now lets look at them in more depth
1.Weak transverse abdominis/ core muscles
transverse abdominis

transverse abdominis
Inevitably as your baby grows, your uterus grows, and places a huge amount of pressure on your mid section, stretching and weakening your entire core. These deep muscles cannot be seen unlike your abs, and are largely responsible for protecting your lumbar spine, keeping you upright, and generally make up the bodies support muscles. It is important to strengthen your core as quickly as possible after birth. This will help reduce back pain, and make the process of handling your baby a whole lot easier. Start with this very basic exercise that will teach you how to ‘turn on’ your deep core/transverse abdominis.
Draw Ins – Deep abdominal engagement
1) Lay on your back, knees bent, feet flat on the floor. Relax your muscles, focusing on relaxing your abs, lower back, and glutes.
2) ‘Draw’ the lower abdominals (area from your belly button to your groin) in towards your spine. Focus on keeping your upper abdominals and glutes as relaxed as possible.
3) Hold for 5–10 seconds while breathing normally (You will feel a tightness/clamping of the deep core muscles around your lumbar spine when done correctly)
4) Rest and repeat 8–12 times. Repeat this set of exercises 4 times each day.
As you become proficient at activating your deep abdominals from this position you can attempt the same contraction sitting or standing. Once you have mastered this you will be able to activate your deep core muscles when walking, even running.
Hip Thrust – Transverse abdominis strengthening/ glute strengthening
1) Lay on your back, knees bent, feet flat on the floor. Relax your muscles, focusing on relaxing your abs, lower back, and glutes.
2) Drive your hips upward, away from the ground. Hands laying flat by your side. Consciously squeeze your glutes. Your body should create a straight line from your shoulder to your knee.
3) Hold for 5–10 seconds while breathing normally (You will feel some pressure on your lower back and glutes), release slowly until your bum just touches the ground, and drive upward again.
4) Complete 6x10seconds hold. Rest for 30-60seconds and repeat 3 times. Repeat this set of exercises 4 times each day.
Plank – Core, abdominals, hip flexors
1) Lay stomach down on the floor.
2) Resting on your elbows, forearms flat along the ground, lift your entire body up of the floor. If done correctly you will be supporting your ‘plank’ of a body by your elbows and toes. Consciously contract and draw in your lower abdominals whilst holding the plank
3) Hold this for as long as you can. Stop when you feel like you have used about 70% of your strength. Core strength varies massively from person to person and this is a great indicator rather than planking for x seconds.
4) Rest for 30-60 seconds and repeat 3 times.
2.Weak Pelvic Floor

Your pelvic floor is made up of ligaments, muscle and tissue that extend from the base of your spine and wrap around to your pubic bone. Your pelvic floor gives you control of your bladder and bowels. These muscles work subconsciously to help control the flow of urine.
the pelvic floor
When you go through pregnancy a few things happen which can cause weakening of the pelvic floor. Firstly, your pelvic floor will loosen to accommodate for the arrival of your little bub. Muscles are stretched and weakened from the pressure placed on the pelvis by the growing bub, and more so during labour.
The process of pregnancy, labour and ultimately giving birth can leave some new mums (approximately 1/3rd) with a weakened pelvic floor. The length of labour, the size of your baby, severe tearing, and forced birth can all impact on the likelihood of a weakened pelvic floor.
As a result you may accidentally pass a little urine when you do something sudden like, cough, laugh, squat and so on. It is very common and can be easily treated. You just need to know how to strengthen your pelvic floor and be consistent with your exercises every day.
Kegel exercise # 1 – pelvic floor focus
1) When going to the toilet try and stop the flow of urine. The muscles you use to stop the flow are the muscles of your pelvic floor. Don’t attempt to stop the flow regularly. This is simply to identify your pelvic floor. Once you are aware of your pelvic floor muscles, its time to move on.
2) Lay on your back, knees bent, feet flat on the floor. Relax your muscles, focusing on relaxing your lower back, muscles in your pelvis, and legs.
2) Tighten the muscle of both passages at the front and back of your pelvis and draw upwards into the groin. Try and keep your abdomen and glutes relaxed.
3) Complete 10 slow squeezes, and then 10 quick squeezes.
4) Rest and repeat 2 times. Repeat this set of exercises 4 times each day.
Once you have mastered this, the second phase is to perform the same exercise whilst standing. Make sure you aren’t tightening your lower abdominals or glutes as you will recruit unnecessary muscles and take the focus off your pelvic floor. The third phase, making you an expert in the art of pelvic floor contractions, is the ability to consciously tell yourself to engage these specific muscles whilst doing everyday things. You should easily be able to engage your pelvic floor when cooking dinner, breastfeeding, on the phone, in the shower, in the supermarket, driving, and so forth. You can switch on your pelvic floor whenever, and wherever you please.
3.Abdominal Muscle Separation (diastasis Recti)
Abdominal separation. Before and after
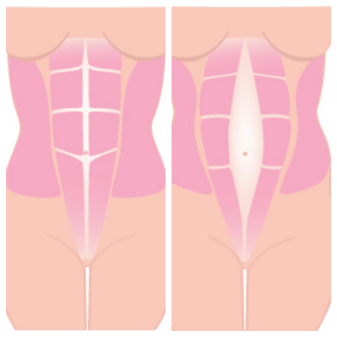
This is a fairly common condition during the later parts of pregnancy and increases in likelihood post birth. Your rectus abdominis, better know as your abs or “6 pack” can separate at the centre due to weakness of the mid-line fascia. This is the line of tissue that runs from just below your sternum and follows downward through the bellybutton to your groin.
You can check the severity of this by measuring the width between your 6 pack using your fingers.
1) Lay on your back, knees bent, feet flat on the floor.
2) Place your fingers just above your belly, pointing down into your stomach.
3) From here you want to perform a crunch. This is not a sit up. Only your head, neck, upper shoulders should leave the floor. Support your head with one hand, the other hand pressing lightly between your abs, lift upward brining your ribcage towards your groin. You should feel a strong contraction in your abs.
4) If done correctly you will feel a flat space between you abs. Yep, believe it or not, everyone has abs! Check both above and below the belly button. How many fingers does it take to fill the flat gap at the centre, between the left and right hand sides of your abs? 1? 2? 3?
Here are some indicators that will determine if you have abdominal separation.
- The gap exceeds more than 2 ½ fingers width.
- The gap between your abs does not reduce in size as you contract.
- You feel a bump or slight protrusion at the mid-line.
As mentioned abdominal separation is quite common and extreme separation of more than 2 ½ fingers should reduce within the postnatal period. A full recovery can take anywhere from 6 weeks up to 9 months. Be sure to avoid any stretching, twisting, lifting heavy things. When getting out of bed, off the ground, or off the couch, make sure you roll onto your side and use your arms for added support. You want to minimise the use of your abs as much as possible, and increase the speed of recovery.
Strengthening of the transverse abdominals (core muscles) can help in the recovery. This is the same exercise as posted above. It has many fantastic uses.
Draw Ins – Deep abdominal engagement
1) Lay on your back, knees bent, feet flat on the floor. Relax your muscles, focusing on relaxing your abs, lower back, and glutes.
2) ‘Draw’ the lower abdominals (area from your belly button to your groin) in towards your spine. Focus on keeping your upper abdominals and glutes as relaxed as possible.
3) Hold for 5–10 seconds while breathing normally (You will feel a tightness/clamping of the deep core muscles around your lumbar spine when done correctly)
4) Rest and repeat 8–12 times. Repeat this set of exercises 4 times each day.
As you become proficient at activating your deep abdominals from this position you can attempt the same contraction sitting or standing.
4.Tight/sore lower back
Lower back pain is very common during pregnancy and postnatal. This can continue on much longer after the postnatal period if you aren’t diligent about core strengthening and mobility improvement through your hips, glutes, and thighs.
During pregnancy you have a huge amount of pressure that is forced onto your spine, your abdominals stretch and weaken as the baby grows, which puts even more pressure on your lumbar spine. As a result your lumbar spine takes a huge amount of stress.
Regarding core strengthening. All of the exercises listed above except for the Kegal Exercise, will be of great help in reducing lower back pain. So keep doing what you’re doing with the above.
You also need to release tightness/tension through your lower back, glutes, and quads. So here are some fantastic mobility exercises to loosen it all up, without straining your core region too much.
Lying Knee Rotations – Lower back, glutes
1) Lie on your back, knees bent, feet flat on the floor and together.
2) Gently roll both knees from side to side as far as possible without feeling pain.
3) Repeat until you feel your lower back loosen up sufficiently. Do not over do it though. 2 minutes should suffice. Repeat 3 times per day.
Knees to Chest – Lower back, hammies
1) Lie on your back, knees bent.
2) Take both knees towards your chest using your hands until you feel a mild to moderate stretch, without feeling pain.
3) Hold for 5 seconds, release your legs to the start position and repeat 10 times.
Prone lift on Elbows – lower back, abdominals
1) Start by lying down on your stomach
2) Gently prop yourself up with your forearms (not hands), keeping your back relaxed. Discontinue if feeling pain in your lower back.
3) Hold for 3 seconds then slowly lower yourself down to the start position. Repeat 10 times provided.
Kneeling Hip Flexor Stretch – Hip Flexors, quads
1) Kneel on one knee with front foot flat on the ground. Your front shin should run perpendicular from your heel to your knee. When in the correct position, the space between your back knee and front leg should create a ‘square.’
2) Driving from your hips, push your front foot forward, driving your knee over your toes. Your foot should still stay flat.
3) Hold the stretch for 5 seconds, come back to the start and repeat 10 times. Change legs and repeat 3 times either leg.
There you have it mums, ladies, and gents. If you were to complete all these exercises in succession, it will take you no more than12 minutes to complete. That’s 12-minute workout to increase core strength, improve your pelvic floor stability, reduce lower back pain, and improve posture. No excuses really. All the exercises are listed in order with instructions, below.
Why not come and try one of our classes. Your first session is on the house, but we do require you to fill out our pre-screening questionnaire. This is for your safety, and to ensure we can give you the best possible service. If you require further information, please contact us.
Stay healthy Mamma's!